Colorado Geology: A Simple GeoDjango Tutorial
GeoDjango is a powerful toolkit for working with spatial data in your web application. In this tutorial, I'll show you how to create a simple GeoDjango app using PostGIS and Leaflet.js as supporting technologies. I'll assume you're familiar with the basics of Django, including project setup and structure. If you can't follow along for any reason, please let me know in the comments and I'll do my best to fill in the gaps for you.
This is a good follow-up tutorial to the excellent tutorial provided by the official docs. Consider grabbing my Vagrant image and doing that one first before taking on this one.
The Objective
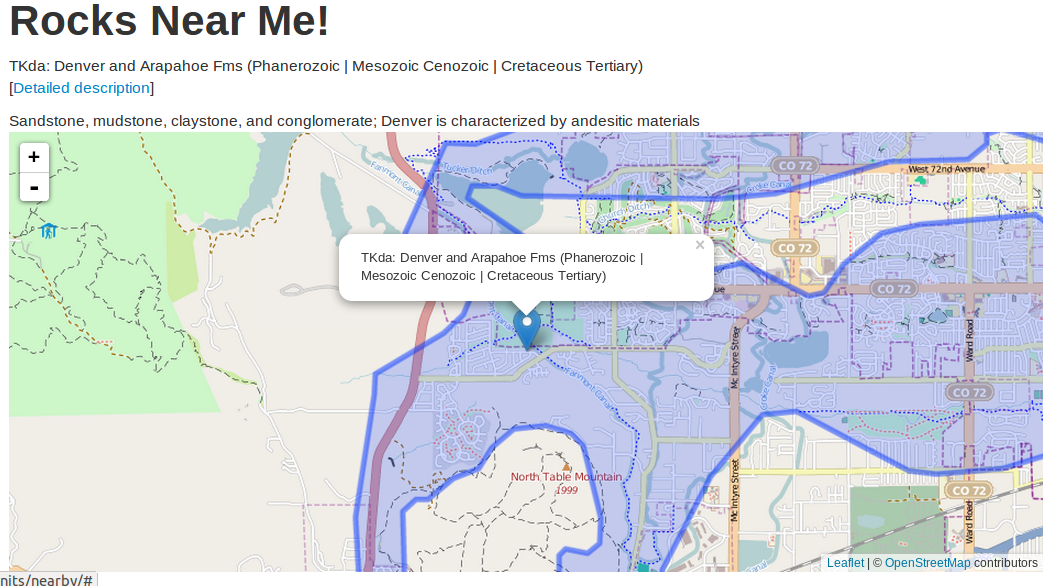
Ever been outside with a group of friends, and suddely realize that you have no idea what geologic formations lie directly below the surface? Probably not, but that's the problem we will be solving with this example app. Using publicly available geologic data for Colorado (my home state), we'll allow a user to give their location (via the HTML5 API), and get information on the geology of the immediate vicinity, including a pretty map. See screenshot of final example:
Setting Up the GeoDjango Project
To make this tutorial a bit easier, I've created a Vagrant image that contains an up to date Django dev environment with PostGIS 2 installed. For those unfamiliar with Vagrant, you can read the getting started guide. If you'd rather not bother with Vagrant, you'll be able to follow along with these instructions provided you have the basic requirements for Django, as well as an installation of PostGIS 2.
Getting Started
Let's start things off by creating our user and database:
$ sudo su postgres

# Create user 'geouser'
$ createuser -U postgres geouser -S -D -R

# Change geouser's password to 'geopassword'
$ psql -U postgres -c "alter role geouser with password 'geopassword';"

# Create database
$ createdb geology

# Use database
$ psql geology

# Add spatial extensions, exit, and exit postgres user.
=# CREATE EXTENSION postgis;
=# \q
$ exit
With the database ready to go, go ahead and create a new Django project, and a new app called "units." You will need the "psycppg2" dependency, as well, so install this via pip. In your settings.py, configure your spatially enabled Postgres database:
DATABASES = {
    'default': {
        'ENGINE': 'django.contrib.gis.db.backends.postgis',
        'NAME': 'geology',
        'USER': 'geouser',
        'PASSWORD': 'geopassword',
        'HOST': '',
        'PORT': '',
    }
}
Note that we use the "django.contrib.gis.db.backends.postgis" engine instead of the standard Postgres engine.
We'll also need to add "django.contrib.gis" (this module is GeoDjango) and our own units app to our installed apps:
INSTALLED_APPS = (
    # Default Django apps:
    'django.contrib.auth',
    'django.contrib.contenttypes',
    'django.contrib.sessions',
    'django.contrib.sites',
    'django.contrib.messages',
    'django.contrib.staticfiles',
    'django.contrib.gis',
    'units'
)
With this, we're now ready to go get some data.
Finding, Modeling, and Importing Data
The first step here is to find the relevant data. Fortunately, a quick search for "colorado geologic map" turns up a useful page from the USGS. For some reason that I am unsure of, the shapefiles available on this page appear to be corrupted, so instead I chose the KML file (cogeol.kml), which I saved into a directoy called "data" inside my "units" app. The rest of the tutorial will assume this location.
A quick inspection of this file shows us that for each geologic unit (that is, type of rock), we have a name, description, and geometry attribute. Rather than manually create a Django model to reflect this attribute, we can use the code generation tool provided by the "ogrinspect" managment command to parse our file and auto-generate our django model:
python manage.py ogrinspect units/data/cogeol.kml Unit \
    --srid=4326 --mapping --multi
This will output the following Python code:
from django.contrib.gis.db import models

unit_srid = 4326

class Unit(models.Model):
    name = models.CharField(max_length=1024)
    description = models.CharField(max_length=1024)
    geom = models.GeometryField(srid=unit_srid)
    objects = models.GeoManager()

# Auto-generated `LayerMapping` dictionary for Unit model
unit_mapping = {
    'name' : 'Name',
    'description' : 'Description',
    'geom' : 'UNKNOWN',
}
Neat! We now have a basic model defined. Ogrinspect picked up the name, description, and geometry attributes from our input data. It's also overridden the default manager with the GeoManager that we'll need to perform spatial queries. We're also given a dictionary object that maps our model fields to our input data attributes, which we can use to simplify our import. We can simply add a string represention for the model to this output, and add it to units/models.py:
def __unicode_(self):
    return "Unit %s" % (name)
Now, how do we import our data? We can create a management command, and use the LayerMapping utility, along with our auto-generating mapping in our models file, to import the data. Create an "import.py" inside "units/management/commands." Be sure to add an empty "init.py" to each sub-folder to keep the Python module system happy. Our importer looks like this:
import os
import units

from django.core.management.base import BaseCommand, CommandError
from django.contrib.gis.utils import LayerMapping

from units.models import Unit, unit_mapping

class Command(BaseCommand):
    help = 'Loads geologic unit data from app data directory'

    def handle(self, *args, **options):
        unit_shp = os.path.abspath(os.path.join(os.path.join(os.path.dirname(units.__file__), 'data/cogeol.kml')))

        lm = LayerMapping(Unit, unit_shp, unit_mapping,
            transform=False, encoding='iso-8859-1')
        lm.save(strict=True, verbose=True)
Easy enough, eh? Now, we can sync our database and import our data"
$ python manage.py syncdb
$ python manage.py import
If all goes well, you will now have a database filled with Colorado geologic units, just waiting to be queried. Let's look at how we can use this data.
Creating URLs and Views
Let's consider our objective again. We want a simple view that shows the user the geologic unit underneath their current location in Colorado. Since we'll be using the HTML5 location API to get the user's position, we'll need to fetch this information asyncronously. Thus, we will need two urls: the base URL, which will render a simple template, and another URL to fetch the the geologic unit as GeoJSON for rendering. Thus, our urls.py in the "geology" app looks like this:
from django.conf.urls import patterns, include, url
from django.views.generic import TemplateView

urlpatterns = patterns('',
    url(r'^$',
    TemplateView.as_view(template_name='units/nearby.html'),
    name='near-me'),
    url(r'^find/$', 'units.views.find_rocks', name='find-rocks'),
)
Let's take a look at our view next, and circle back to the template. First, to make dealing with GeoJSON a bit easier, let's install the Django GeoJSON via:
$ pip install django-geojson
Then, we need to add it to our installed apps:
# settings.py

INSTALLED_APPS += (
    'djgeojson',
)
With this out of the way, we can create our view:
from django.http import HttpResponse, HttpResponseBadRequest
from django.contrib.gis.geos import Point
from djgeojson.serializers import Serializer as GeoJSONSerializer

from .models import Unit

def find_rocks(request):
    """
    Given a given lat/long pair, return the unit(s) surrounding it.
    """
    if request.is_ajax():
        lat = request.GET.get('lat', None)
        lon = request.GET.get('lon', None)

        if lat and lon:
            point = Point(float(lon), float(lat))
            units = Unit.objects.filter(geom__contains=point)
            geojson_data = GeoJSONSerializer().serialize(
                units, use_natural_keys=True)

            return HttpResponse(geojson_data,
                mimetype='application/json')
    msg = "Bad request: not AJAX or no latlong pair present"
    return HttpResponseBadRequest(msg)
This view takes an AJAX request, gets the 'lon' and 'lat' parameters from the query string, creates a spatial "Point" object from them, queries our Units using a "contains" spatial query, and then serializes the results to GeoJSON. You can really see the power of the geometric model fields with this query.
Front End and Mapping
Let's take a look at the front end now. We'll need view template and some JavaScript. Let's look at the view:
{% extends 'base.html' %}
{% load static %}

{% block title %}Rocks Near Me!{% endblock title %}
{% block page_title %}Rocks Near Me!{% endblock page_title %}
{% block extra_css %}
 <link rel="stylesheet" href="http://cdn.leafletjs.com/leaflet-0.6.4/leaflet.css" />
 <!--[if lte IE 8]>
     <link rel="stylesheet" href="http://cdn.leafletjs.com/leaflet-0.6.4/leaflet.ie.css" />
 <![endif]-->
 <style>
    #map {
        height: 400px;
        width: 6b00px;
     }
 </style>
{% endblock extra_css %}

{% block content %}
<div id="location"></div>
<div id="rocks">Finding rocks...</div>
<div id="map"></div>
{% endblock content %}

{% block extra_js %}
<script>var url = "{% url 'find-rocks' %}";</script>
<script src="{% static 'jquery/jquery.min.js' %}" ></script>
<script src="http://cdn.leafletjs.com/leaflet-0.6.4/leaflet.js"></script>
<script src="{% static 'js/map.js' %}" ></script>
{% endblock extra_js %}
We're basically just setting up for our dynamic content here. The only Django specific bit is where we render our "find-rocks" url into the template.
Now, for the fun part: the JavaScript. We'll be using Leaflet.js, a simple JavaScript mapping tool. Our JavaScript will look like this:
(function() {
var loc = $("#location");
var rocks = $("#rocks");
var getLocation = function() {
if (navigator.geolocation) {
navigator.geolocation.getCurrentPosition(handlePosition);
} else {
loc.html("GeoLocation not supported");
}
}
var handlePosition = function(position) {
var lat = position.coords.latitude;
var lon = position.coords.longitude;
$.get(url, {"lat": lat,
"lon": lon },
function(data) {
rocks.empty();
$.each(data.features, function(index, val) {
var name = val.properties.name;
var description = val.properties.description;
rocks.append(name);
rocks.append(description);
makeMap(val, lon, lat);
});
});
}
var featurePopup = function(feature, layer) {
var popupContent = feature.properties.name;
if (feature.properties && feature.properties.popupContent) {
popupContent += feature.properties.popupContent;
}
layer.bindPopup(popupContent);
}
var makeMap = function(feature, lon, lat) {
var map = L.map('map').setView([lat, lon], 13);
//Unit
var unit = L.geoJson(feature, {
onEachFeature: featurePopup
}).addTo(map);
//OSM layer
L.tileLayer('http://{s}.tile.osm.org/{z}/{x}/{y}.png', {
attribution: '© <a href="http://osm.org/copyright">OpenStreetMap</a> contributors'
}).addTo(map);
// Marker
L.marker([lat, lon]).addTo(map)
.bindPopup(feature.properties.name)
.openPopup();
}
getLocation();
})();
The first half of the file get's the user's location via the HTML5 API, and queries our view for the geologic unit for that location. If there is a result, we append the name and description attributes from our result GeoJSON to our page.
The second half is our mapping code using Leaflet.js. We create a map, an OpenStreetMaps layer, our GeoJSON later, and finally a marker to show the user's current location. All put together, it looks like this:
Conclusion
If you'd like to check out the entire finished product, I have a GitHub repo you can clone. If you have any questions, comments, or issues, please let me know in the comments. Thanks for reading!
comments powered by Disqus